Installation and Maintenance is the difference between solar path lights that look amazing for years and the sad, flickery “why did I buy these?” stakes you replace every season. Here’s the fast win: charge new lights 24–48 hours in full sun before the first night, place them where they get real sun (not “kinda sun”), and set spacing based on how you actually use the path—not what the box photo shows.
Within the next 10 minutes, you can do three things that instantly boost performance: (1) pick sun-first locations (6+ hours of direct sun is the sweet spot), (2) stabilize the base with a small gravel collar so they don’t lean after rain, and (3) clean the solar panel properly (no waxy sprays, no oily residue). Those three moves solve most “dim light” complaints before they happen.
Table of Contents
- The 10-Minute Installation Plan (No Guessing)
- Site Planning and Layout That Looks Intentional
- Sun and Shade Reality Check (Why “Bright Area” Lies)
- Spacing, Height, and Glare Control
- Tools and Materials You Actually Need
- Ground Types and Mounting Options (So They Don’t Lean)
- Step-by-Step Installation (Beginner-Friendly, Pro Results)
- Weatherproofing and Water Management
- Battery Care and Replacement (The Hidden Performance Lever)
- Cleaning and Seasonal Maintenance Schedule
- Troubleshooting Dim or Dead Lights
- Upgrades and Performance Hacks (Without Wasting Money)
- Common Mistakes I Keep Seeing (and How to Avoid Them)
- FAQ
- Resources / Tools
The 10-Minute Installation Plan (No Guessing)
If you want the shortest route to “clean install that performs,” follow this sequence. It’s the same order I use because it prevents rework.
1) Identify the “solar budget” first
Solar path lights live or die by sunlight. Walk your path at midday and note where you get true direct sun. If a spot is shaded by trees, fences, or the house for most of the day, that’s not a “maybe.” That’s a “no,” unless you choose lights designed to handle low-sun conditions (and even then, expectations need to be realistic).
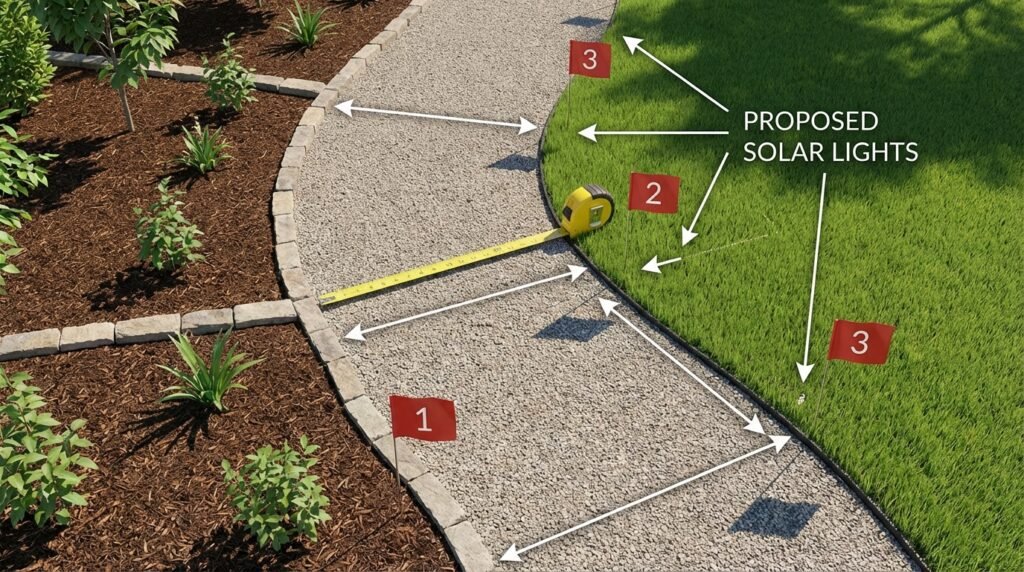
2) Mark spacing with something temporary
Use small flags, stones, or painter’s tape on the edge of the path. Don’t install yet. At dusk, step outside and look at the layout from the street and from your front door. Adjust until it looks balanced. This five-minute preview saves the “why does it look random?” regret.
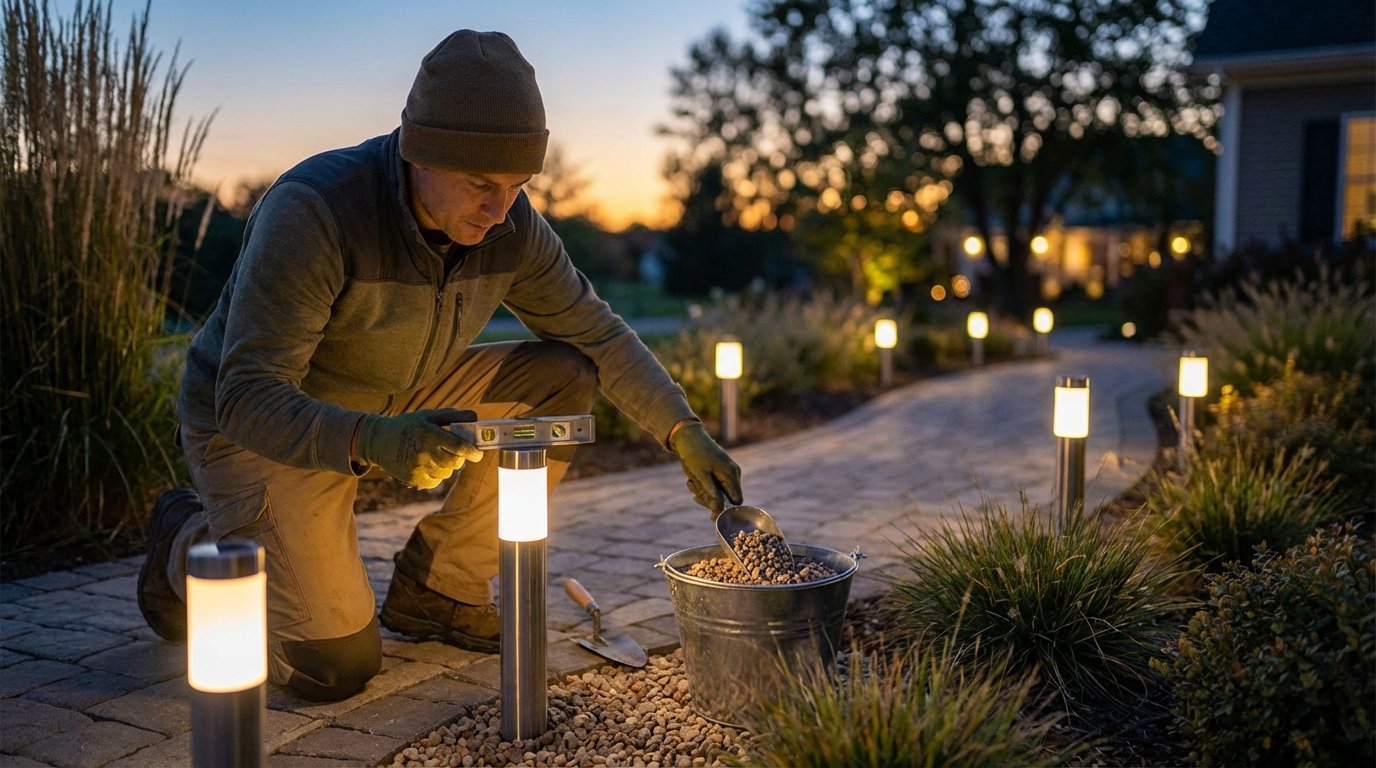
3) Stabilize bases before you stake
A small gravel collar around each stake location keeps lights from leaning after rain and prevents soft soil from swallowing them. You’re not building a foundation—just giving the stake a stable, draining zone.
4) Charge before night one
Most new solar lights need an initial “full” charge cycle. Set them in full sun (or switch them on and leave them in the brightest spot) for 24–48 hours. This is boring. It also fixes a huge percentage of first-week complaints.
Want a broader buying context before you install? Skim your pillar buyer guidance first, then come back here for execution: solar path lights buyer’s guide and reviews.
Site Planning and Layout That Looks Intentional
Solar path lights can either look like a designed landscape feature or like you lost a bet and had to stake plastic torches into the lawn. The difference is layout discipline.
Define your goal: guide, glow, or statement
Before you pick spacing, be honest about the job:
- Guide lighting: you want clear edge definition so people don’t step off the path.
- Glow lighting: you want soft ambience and a gentle “welcome” vibe.
- Statement lighting: you want a visible design line—more lights, closer spacing, stronger output.
Guide lighting usually needs fewer fixtures than statement lighting. If you install statement density when you only needed guidance, you can end up with glare, visual clutter, and a cheap look.
Plan sightlines, not just distance
Stand at the main viewing angles: the driveway, your front door, the sidewalk, the patio. Lights should look evenly spaced from those perspectives, even if the physical spacing varies slightly due to curves or landscaping.
Insider tip: For curved paths, measure spacing along the inside curve, not the outside. The inside curve is what your eyes track, so it’s the line that needs consistent rhythm.
Sun and Shade Reality Check (Why “Bright Area” Lies)
Here’s the blunt truth: “bright” is not the same as “direct sun.” Solar panels care about exposure, not vibes.
How much sun is enough?
In most real yards, aim for 6+ hours of direct sunlight for reliable nightly performance. You can get light with less sun, but runtime and brightness drop fast—especially in winter and in cloudy weeks.
Shade traps you don’t notice until it’s too late
- Morning shade from the house: looks fine at noon, but kills charging time.
- Tree canopy “dappled sun”: the panel gets teased all day and never really charges.
- Fence shadows: long afternoon shadows can wipe out the best charging hours.
- Shrubs that grow: today’s perfect spot becomes next month’s shade pocket.
Practical test: Put a sticky note on the ground where you want a light. Check it at 10am, 1pm, and 4pm. If that spot is shaded in two out of three checks, it’s not a prime solar location.
When to prune versus relocate
Pruning can help, but don’t turn “path lights” into a lifelong tree-management subscription. If a location is fundamentally shaded, relocate lights to the sun side and use fewer, better-positioned fixtures rather than forcing a dense row in bad charging conditions.
If you care about light pollution and glare (and you should, because it affects neighbors and your own night vision), the International Dark-Sky Association has clear guidance on responsible outdoor lighting. It’s more relevant than most product manuals: DarkSky lighting principles.
Spacing, Height, and Glare Control
Spacing is where most installs go wrong. People either space too far apart (sad dotted line) or too close (airport runway).
Simple spacing rules that work
- Guide lighting: typically 6–10 feet apart, depending on beam spread and path width.
- Glow lighting: typically 4–7 feet apart for a smoother look.
- Statement line: 2–5 feet apart, but only if lights are low-glare and consistent color.
Don’t worship numbers. Use them as a start, then adjust after a dusk preview.
Height and “aim” matter more than people think
Many solar path lights are low to the ground and emit light outward. If you place them too close to eye level on steps or raised borders, you can get glare. Keep fixtures lower where people walk, and avoid placing lights where they shine directly into seating areas.
If you want to get nerdy about outdoor lighting safety and best practices (without marketing fluff), the U.S. Department of Energy’s energy saver resources are a solid baseline reference: DOE Energy Saver on LED lighting.
Tools and Materials You Actually Need
You don’t need a workshop. You do need the right few items so you’re not twisting plastic stakes into rocky soil until something snaps.
- Hand trowel or bulb planter: for clean holes and controlled depth.
- Rubber mallet: only if you’re tapping a pilot hole tool, not pounding the light itself.
- Small level: keeps lights upright (crooked lines look cheap).
- Pea gravel: for drainage collars and stability.
- Work gloves: saves your hands when soil is rocky.
- Microfiber cloth: for panel and lens cleaning without scratching.
Insider tip: Keep a short piece of rebar or a sturdy screwdriver to create a pilot hole in hard soil. Insert, wiggle, remove, then place the stake. You’ll stop breaking stakes overnight.
Ground Types and Mounting Options (So They Don’t Lean)
Your ground decides your mounting strategy. Ignore this and you get leaning lights, water issues, and constant “straightening.”
Soft soil and mulch
Soft soil makes installation easy—and stability hard. Stakes sink and tilt over time. Solution: make a small pilot hole, seat the stake, and add a pea gravel collar around the stake base for drainage and firmness.
Clay soil and poor drainage
Clay holds water. Water plus freeze-thaw cycles is how lights get pushed up or tilted. Build a small drainage pocket: remove a little soil, add gravel, then install. The goal is to keep the stake area from becoming a wet sponge.
Rocky or compacted soil
Rocky soil is where cheap plastic stakes go to die. Pilot hole first. If you hit rocks constantly, consider alternative mounting: install lights along a border where you can create a narrow trench with better substrate, or use surface-mount bases if the product supports it.
Gravel paths and crushed stone
Gravel paths are tricky because stakes don’t “bite” well. The clean approach is to anchor lights just outside the gravel edge into soil, or create a compacted pocket under the gravel using a small soil insert.
Concrete and pavers
Most stake-style solar path lights are not meant to be drilled into concrete. If you want lights on pavers, choose models designed for surface mounting or look for accessories that allow mounting to hardscape edges. Otherwise, position lights in adjacent planting beds to avoid ugly improvised installs.

Step-by-Step Installation (Beginner-Friendly, Pro Results)
This is the installation flow that holds up through weather, mowing, pets, and real life. Adjust for your specific model, but keep the logic.
Step 1: Unbox and inspect like you mean it
Check for cracks, loose lenses, and battery compartments that don’t seal well. If something is flimsy out of the box, it will not improve outdoors.
Step 2: Do the initial charge cycle
Charge 24–48 hours in full sun before relying on night performance. If your light has an on/off switch, set it to ON. Some models charge regardless; some don’t. The safe move is ON + full sun.
Step 3: Remove protective films (yes, really)
A surprising number of panels ship with a thin protective film. If you don’t remove it, the light “works” but stays weak. This is one of those annoying, real-world details nobody brags about on product pages.
Step 4: Mark positions and do a dusk preview
Place markers where each light will go. Wait until dusk and evaluate. Move markers until the line looks smooth and intentional. Install after you like the visual rhythm.
Step 5: Create pilot holes, don’t brute force stakes
Use a trowel, bulb planter, or a pilot tool to open the ground. Insert the stake after the hole exists. Twisting a stake into hard soil is how you snap it, then blame the product.
Step 6: Seat and level each fixture
Push the stake in until the fixture base is stable. Use a small level or eyeball from a distance. A straight line is the difference between “landscape upgrade” and “yard clutter.”
Step 7: Add a gravel collar for stability and drainage
Add pea gravel around the stake entry point. This reduces pooling water and helps stop leaning. It’s not fancy. It works.
Step 8: Test sensors and modes now, not after you’re done
Cover the panel with your hand to simulate night and confirm it turns on. If there are brightness modes, cycle them. Verify you didn’t install a mix of modes by accident—yes, that happens more than you’d think.
If you’re trying to match brightness and beam pattern across the path (so you don’t get the “random patchy” look), it helps to understand output expectations. Keep your related brightness guide handy: how to choose the right brightness for solar path lights.
Weatherproofing and Water Management
Solar lights fail in boring ways: water intrusion, corrosion, and battery compartment gunk. The fix is also boring—but it keeps lights alive.
Seal checks and gasket sanity
If your model has a battery compartment, check that the gasket is seated correctly and the cover closes flush. A pinched or twisted gasket turns “weather-resistant” into “moisture welcome.”
Drainage is a feature, not an afterthought
Standing water around the base accelerates corrosion and encourages insects. The gravel collar helps. Also avoid installing in low spots where water naturally collects—unless you like replacing lights.
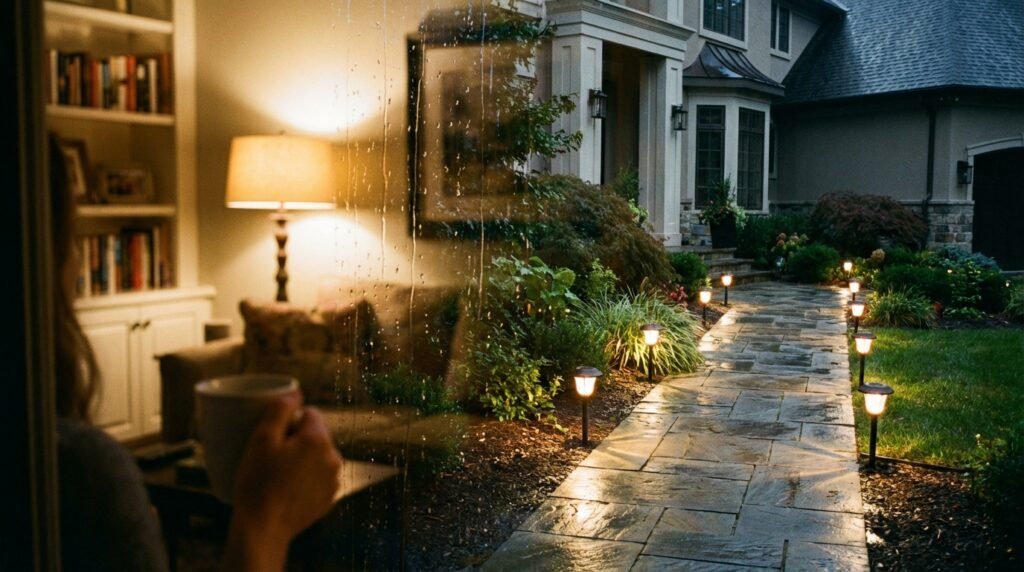
Snow, ice, and freeze-thaw cycles
Freeze-thaw pushes fixtures around and can crack cheaper housings. In colder climates, consider pulling lights for winter storage or switching to a seasonal maintenance approach: remove, clean, store, reinstall in spring. If you leave them out, check alignment after major freezes.
For general battery safety and consumer product guidance, the U.S. Consumer Product Safety Commission is a credible reference point, especially if you’re handling rechargeable batteries: CPSC battery safety guidance.
Battery Care and Replacement (The Hidden Performance Lever)
If your solar lights get dim after a few months, batteries are the first suspect. Not the sun. Not the panel. Batteries.
Know what batteries you have
Many solar path lights use AA or AAA rechargeable cells, commonly NiMH (nickel-metal hydride). Some use lithium-based packs or integrated cells you can’t easily replace. If your lights accept replaceable AA/AAA, you’re in luck: performance is easier to restore.
Don’t mix battery types or capacities
Mixing chemistries (like NiMH and NiCd) or mixing different capacities in the same light is a recipe for inconsistent charging and shorter lifespan. Replace like-for-like, and replace in pairs if your model uses two cells.
When to replace batteries
- Early signs: shorter runtime, dimmer output, delayed turn-on.
- Seasonal clue: lights used to last all night in summer but die early even on clear nights.
- Hard fail: no light even after cleaning and full sun exposure.
Battery “upgrades” and tradeoffs
Higher-capacity NiMH cells can increase runtime, but only if the solar panel can actually charge them fully. If the panel is small and the location has borderline sun, bigger batteries can ironically perform worse because they never reach a full charge. Match capacity to your charging conditions: strong sun can support higher capacity; low sun needs realistic capacity.
For a deeper technical baseline on solar energy fundamentals and performance variables, the National Renewable Energy Laboratory is the grown-up table at the party: NREL solar research overview.
Cleaning and Seasonal Maintenance Schedule
Maintenance isn’t hard. It’s just consistent. Five minutes a month beats a full replacement order every spring.
Monthly: the 5-minute check
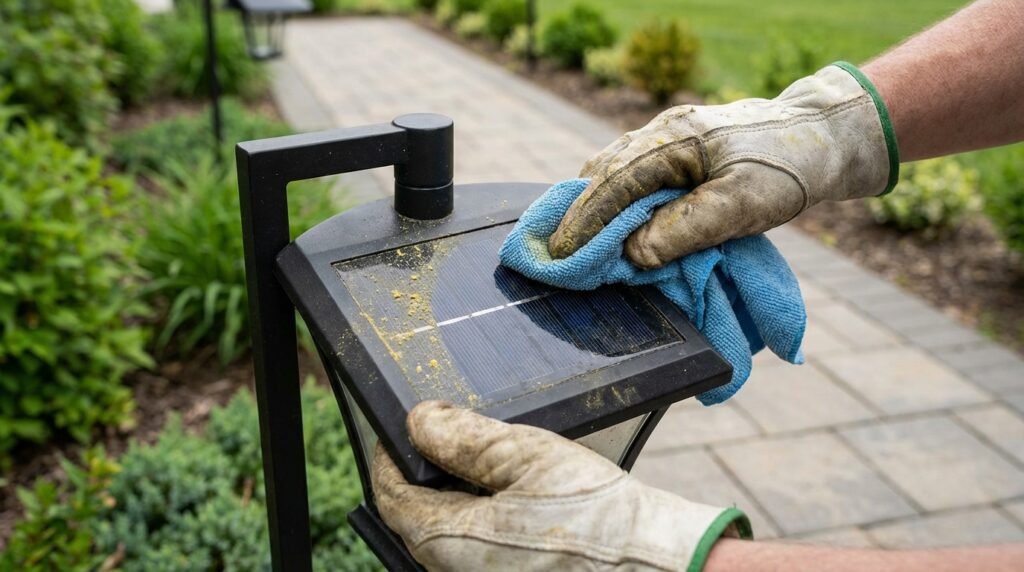
- Wipe the solar panel: use a damp microfiber cloth. If there’s grime, a mild soapy solution is fine, then rinse with clean water and dry.
- Clean the lens: dust and pollen reduce brightness more than people expect.
- Check alignment: straighten anything leaning. Do it early before the stake “sets” crooked.
Seasonal: what changes through the year
Spring: pollen season is brutal on panels. Expect to wipe more often. Also check for water intrusion after heavy spring rains.
Summer: longest days, best performance. Great time to re-layout spacing if you want more “glow” and less “dot-dot-dot.”
Fall: leaf debris blocks panels. Clear leaves weekly if you’re under trees.
Winter: shortest days, lowest sun angle, most cloud cover. Performance will drop. That’s normal. Your job is to keep panels clean and expectations sane.
What not to use: avoid oily cleaners, wax sprays, or anything that leaves residue on the panel. Residue attracts dust and reduces light transmission.
If you’re planning seasonal swaps or a refresh, it helps to track deal cycles and replacement timing. Here’s a convenient reference point for shopping strategy when you’re ready: best deals on solar path lights.
Troubleshooting Dim or Dead Lights
Most problems are predictable. The trick is diagnosing in the right order so you don’t waste time.
The diagnosis order (fastest path to truth)
- Check sun exposure: has shade changed? New growth? Seasonal sun angle?
- Clean panel and lens: dirt is the silent killer.
- Confirm switch/mode: some lights have low/high/off, and it’s easy to bump.
- Test at “night”: cover the panel fully and see if it turns on.
- Inspect battery compartment: corrosion, moisture, loose contacts.
- Replace batteries: with correct type and fresh cells.
Symptom: bright at dusk, dead by 9pm
This usually means batteries are aging or charging is marginal. Clean the panel, then consider replacing batteries. If it’s winter, some drop is normal—but “two hours and done” is usually battery-related.
Symptom: only some lights work, others don’t
That’s often inconsistent sun exposure (some are shaded), mixed modes (some set to low, some high), or battery mismatch across units. Standardize mode settings, then check shade patterns.
Symptom: flickering or inconsistent brightness
Flicker is commonly a bad battery connection, moisture in the compartment, or corrosion. Clean contacts gently, ensure the battery cover is sealed, and replace the battery if it’s old.
Symptom: never turns on, even after charging
Work the checklist: remove film, clean panel, confirm switch, test by covering panel, and try a known-good battery. If it still doesn’t turn on, the unit may be defective or the internal controller is dead. At that point, you’re done diagnosing—replace it.

Upgrades and Performance Hacks (Without Wasting Money)
You can improve performance and longevity without buying a whole new set—if you pick upgrades that match the failure mode.
Upgrade 1: Better rechargeable batteries (when appropriate)
If your lights use replaceable NiMH AA/AAA batteries, upgrading to reputable, consistent cells can improve runtime and reduce weird brightness inconsistency. Just don’t oversize capacity if your panels are small and your sun exposure is borderline.
Upgrade 2: Stability and theft resistance
If kids, pets, wind, or “mysteriously missing lights” are an issue, add stability:
- Use deeper pilot holes and a gravel collar.
- Consider discreet anchoring methods (like landscaping staples or hidden ties) depending on your fixture design.
- Place lights slightly inside beds rather than right on the edge where feet and mowers clip them.
Upgrade 3: Glare control and aesthetics
If your lights are too harsh, you don’t always need new fixtures. Sometimes the fix is spacing and placement: slightly wider spacing reduces runway glare. Also avoid pointing bright lenses toward seating or windows.
Upgrade 4: Build a tiny maintenance kit
A microfiber cloth, a small brush, and spare batteries in a labeled bag. That’s it. Keeping these together prevents the “I’ll deal with it later” spiral that ends in replacements.
For general environmental guidance on outdoor lighting impacts and reducing unnecessary light spill, the EPA has useful context on light pollution and environmental considerations (it’s not just aesthetics): EPA resources.
Common Mistakes I Keep Seeing (and How to Avoid Them)
You asked for no-BS, so here it is. These mistakes are why people think solar path lights “don’t work.” They work. The install is sloppy.
Mistake #1: Installing in shade and hoping
Hope doesn’t charge batteries. If the panel doesn’t get direct sun, your light is running on fumes. Relocate or accept shorter runtime.
Mistake #2: Skipping the initial charge cycle
New lights often need that first full charge. If you install at 6pm and expect a miracle at 8pm, you’ll get disappointment and a return label.
Mistake #3: Forcing stakes into hard ground
Snapped stakes aren’t “bad luck.” They’re physics. Pilot hole first. Always.
Mistake #4: Leaving protective film on panels
This one is painfully common. The light turns on… barely. Remove the film, then suddenly it “magically” works better.
Mistake #5: Using waxy or oily cleaners
Residue on panels blocks light and collects dust. Use mild soap and water or just a damp microfiber cloth.
Mistake #6: Mixed modes and mismatched batteries
Half your lights on high, half on low, some with old batteries, some with new. The result looks inconsistent and “cheap.” Standardize settings and replace batteries consistently.
Insider tip: Do your final spacing and alignment check from inside your house at night (through the window). That’s how you’ll see it most often. It’s also where uneven spacing is most obvious.
FAQ
How long do solar path lights usually last?
Good housings can last multiple years, but rechargeable batteries often need replacement sooner (commonly within 1–2 years depending on climate and usage). The light isn’t “dead” just because runtime drops—batteries are typically the fix.
How many hours of sun do solar path lights need?
Plan for about 6+ hours of direct sun for reliable performance. Less sun can still work, but brightness and runtime usually drop—especially in winter.
Why are my solar path lights dim?
Top causes: dirty panels, shade, old batteries, or mixed modes/settings. Clean the panel first, then check shade patterns, then test/replace batteries.
Can I leave solar path lights outside in winter?
Usually yes, but performance drops with shorter days, cloud cover, and snow blocking panels. In harsh freeze-thaw areas, removing and storing them can extend life and reduce cracking.
Do I need to turn solar path lights on to charge?
Depends on the model. Some charge regardless; some require the switch to be on. The safe move is to set them to ON during the initial charging cycle.
Should I use lithium or NiMH rechargeable batteries?
Use the type your light is designed for. Most replaceable-cell models are built around NiMH. Swapping chemistries without manufacturer guidance can cause poor charging behavior or inconsistent performance.
How do I stop solar path lights from leaning?
Create a pilot hole, install at the right depth, and add a pea gravel collar at the base. Leaning is usually a soil stability and drainage problem, not a “bad light” problem.
Can I install solar path lights on gravel or pavers?
Stake-style lights work best in soil. For gravel, anchor just off the gravel edge into soil, or create a compacted pocket. For pavers/concrete, use surface-mount designs—don’t improvise drilling unless the product is made for it.
Why do solar path lights turn off early at night?
Usually batteries are aging, charging is reduced by shade/dirt, or you’re in a low-sun season. Clean the panel, confirm sun exposure, then replace batteries if the issue persists.
How often should I clean the solar panels?
Monthly is a good default. Under trees or during pollen season, you may need to wipe them more often. If brightness drops, cleaning is the first move.
Resources / Tools
These are practical, Amazon-easy tools and supplies that directly support better installs and less maintenance. No hype—just stuff that makes the lights work better and last longer.
Pea Gravel
Creates a stable, draining collar around stakes to reduce leaning and water pooling.
Best for: Soft soil, clay soil, rainy climates.
Hand Trowel (Garden Trowel)
Makes clean pilot holes so you’re not snapping stakes or fighting compact soil.
Best for: Any stake-style installation.
Bulb Planter Tool
Fast, consistent holes at controlled depth—great for installing multiple lights in a line.
Best for: Clean installs with uniform height.
Small Torpedo Level
Keeps lights upright so the line looks intentional, not accidental.
Best for: Long straight runs and front-walk symmetry.
Microfiber Cleaning Cloths
Cleans panels and lenses without scratching or leaving lint.
Best for: Monthly maintenance and pollen season.
Mild Outdoor-Safe Soap (Gentle Cleaner)
Helps remove grime without leaving oily residue that attracts dust.
Best for: Dusty areas and heavy buildup.
Rechargeable NiMH AA Batteries
Restores runtime and brightness when existing cells age out.
Best for: Solar lights that use replaceable AA cells.
Rechargeable NiMH AAA Batteries
Same performance refresh as AA, for compact fixtures.
Best for: Solar lights that use replaceable AAA cells.
Smart Battery Charger (NiMH Compatible)
Helps you test and maintain spare cells; useful for diagnosing “battery or light?” problems.
Best for: Anyone maintaining multiple lights or spares.
Dielectric Grease
Reduces corrosion risk on battery contacts in humid or rainy environments.
Best for: Coastal areas, high humidity, frequent rain.
Landscape Flags (Marking Flags)
Makes dusk layout previews fast and clean before you commit to holes.
Best for: Curved paths and design-focused installs.
Outdoor Cable Ties or Anchoring Staples
Extra stability and discreet anti-tamper support where needed (depending on fixture design).
Best for: Windy areas, high-traffic paths, playful pets.
As an Amazon Associate I earn from qualifying purchases.