How to Install Solar Path Lights Like a Lighting Engineer
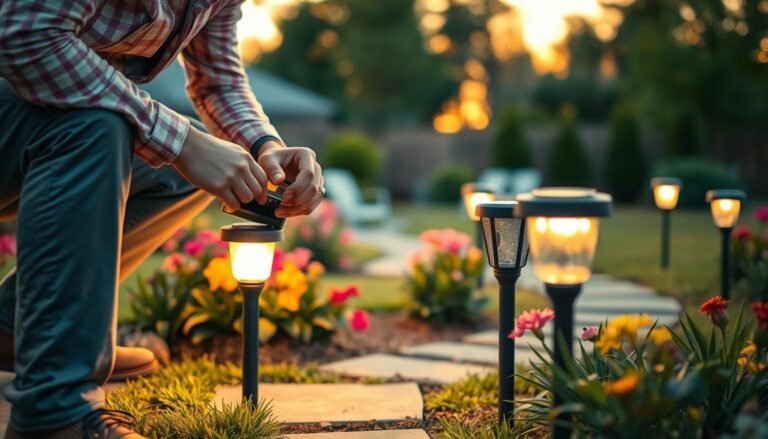
If you’re searching how to install solar path lights, you’re probably hoping for two things: they look clean in daylight, and they don’t turn into sad little glow-worms after 9 PM. Here’s the truth: most “bad solar lights” are actually bad installs (and yeah… sometimes they’re just junk).
The problem is people treat solar path lights like lawn darts—stab, shrug, done. Fast forward to the first cloudy week, and suddenly they’re dim, leaning, and spaced like an airport runway. Let’s fix that. This is the veteran, no-BS method that makes even mid-range lights look expensive.
Table of Contents
- Pick the right spots (sun beats aesthetics)
- Layout and spacing that looks professional
- Prep the ground (don’t snap stakes)
- Install step-by-step (the pro sequence)
- Aim, glare control, and “why does it look weird?”
- Batteries and the first charge cycle
- Weather, seasons, and expectations (the adult talk)
- Maintenance that actually moves the needle
- Frequently Asked Questions
- Final insider takeaway
Pick the right spots (sun beats aesthetics)
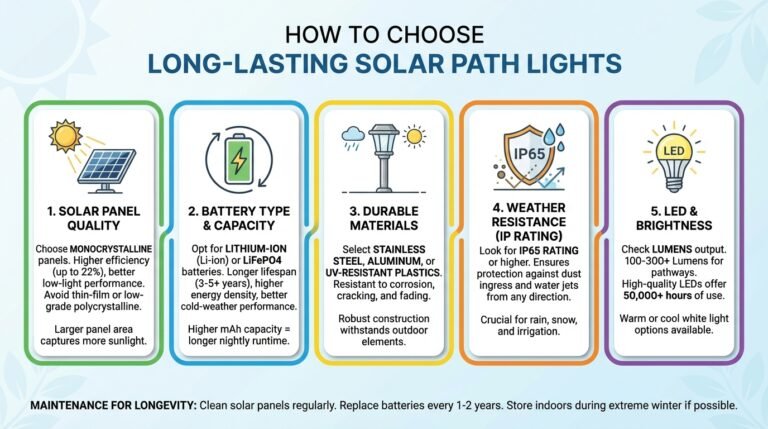
Snippet answer (read this twice): To install solar path lights correctly, place them where the solar panel gets the most direct sun, plan spacing for an even “guiding” glow, pre-make holes in hard soil, seat stakes straight and deep, and run a full 1–2 day charge cycle before judging brightness. Clean panels and stable mounting matter more than hype specs.
Solar path lights are tiny solar power systems. If you starve the panel, you starve the battery, and the LED suffers. That’s not “mysterious solar performance.” That’s physics. If you want the basics of how photovoltaic conversion works, Wikipedia actually does a solid job on the fundamentals of solar cells (Solar cell overview).
Rule #1: panels need direct sunlight, not “bright shade.” Trees, fences, roof overhangs, even tall shrubs—these are all brightness assassins. If your path is shaded most of the day, you have three realistic options:
- Use fewer lights and place them where the sun is best (and accept a more subtle look).
- Buy higher-quality lights with better panels/batteries (not bargain-bin packs of eight).
- Stop pretending solar is the answer and consider low-voltage wired lighting.
Also: wipe the panels before install. Dust + pollen = free performance loss. If you want a credible, non-marketing overview of solar energy basics, the U.S. Department of Energy’s solar pages are a good reality check (DOE: Solar Energy Basics).
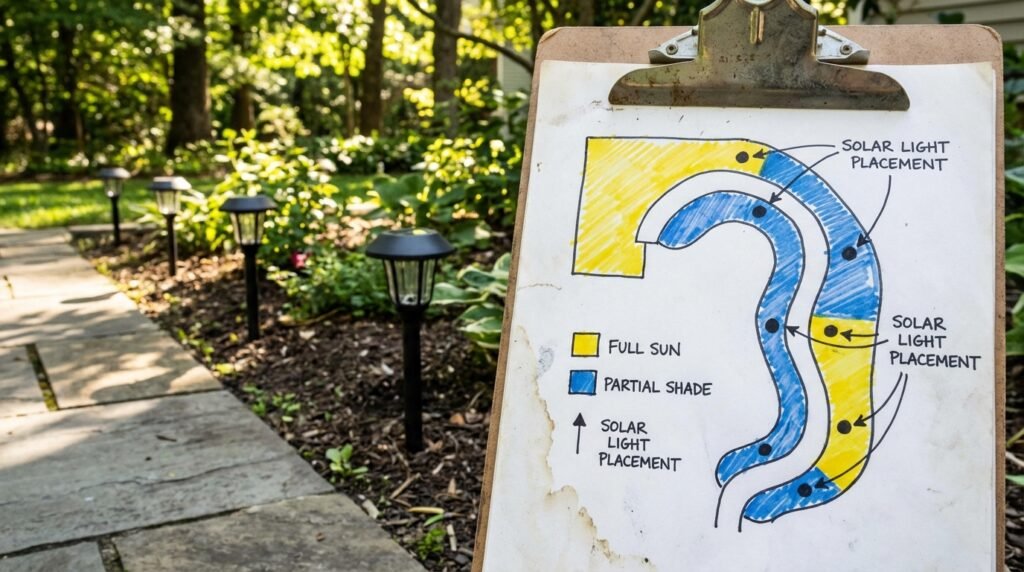
Before you buy anything, scan your yard like an engineer: where does the sun hit for the longest stretch? That’s where your “hero lights” go. If you’re still shopping, this is where a no-BS deal guide helps you avoid the usual traps—see our best deals on solar path lights (no-BS guide) and pick lights that aren’t designed to disappoint.
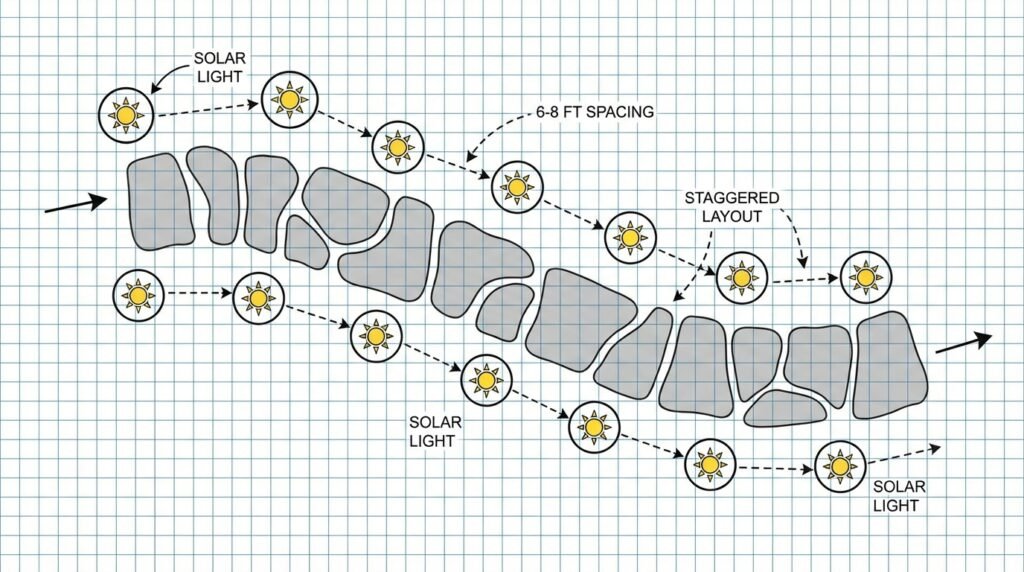
Layout and spacing that looks professional
Most people either under-light (dark gaps) or over-light (tacky runway). The sweet spot depends on brightness, lens style, and what you’re trying to achieve:
- 6–8 feet apart: clean, premium “guide the path” look for most decent lights.
- 4–6 feet apart: if the lights are modest brightness or the path is wide.
- 10+ feet apart: only if the lights are genuinely bright and focused (rare in cheap sets).
Bottom line: spacing is about uniformity, not maximum brightness. You want a consistent rhythm, not random hotspots. And if you’re confused about brightness claims (lumens, “equivalent watts,” and other marketing poetry), read how to choose the right brightness for solar path lights so you’re not installing based on fantasy specs.
Pro layout move: don’t center lights on the path edges like soldiers. Offset them slightly, or stagger left-right on long runs. It looks intentional and avoids the “line of spikes” vibe.
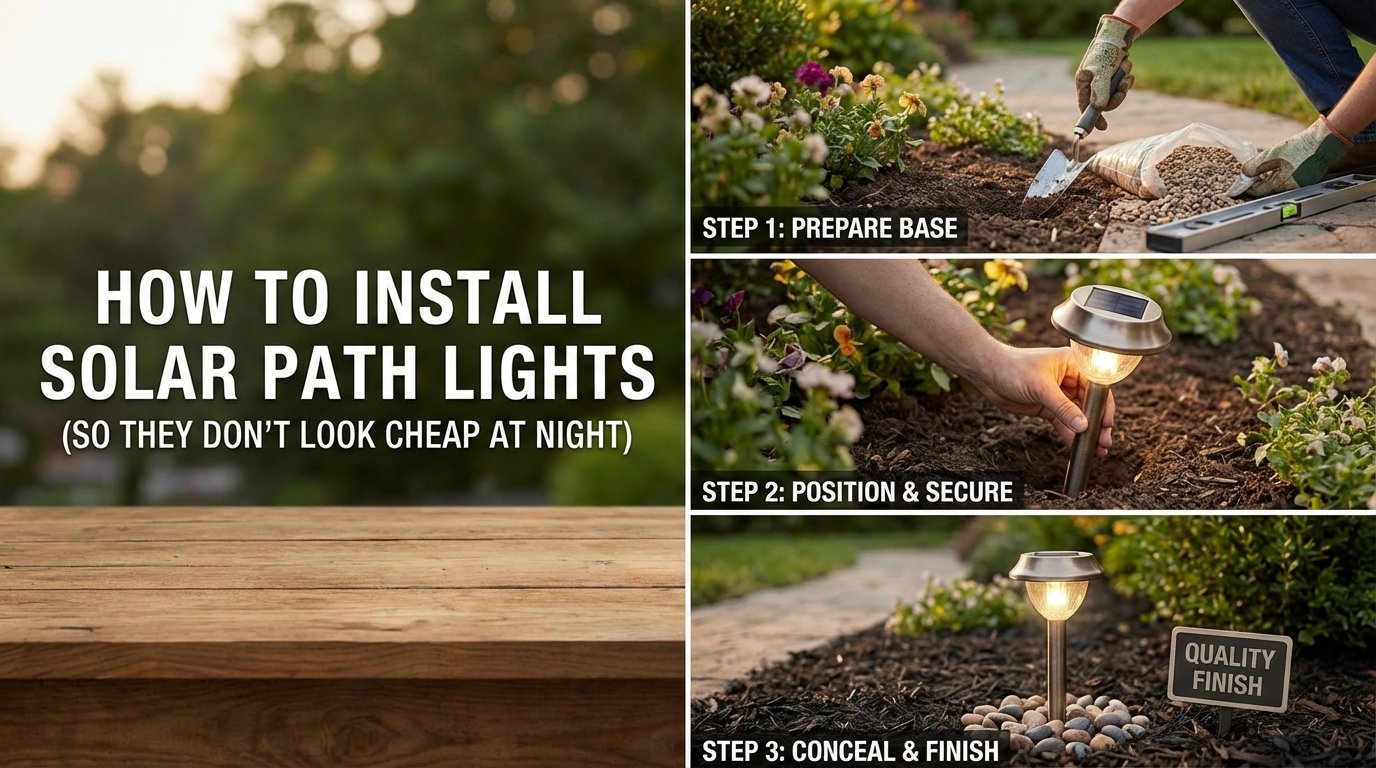
Prep the ground (don’t snap stakes)
This is where installs go to die: hard clay, rocky soil, or frozen ground. If you brute-force a plastic stake into tough soil, it will snap. Not “might.” It will. And then you’ll write a one-star review like the light personally insulted your family.
Do this instead: make a pilot hole first. Use a long screwdriver, a piece of rebar, or a bulb planter tool. Wiggle it around to open the hole slightly. Then insert the stake.
If you’re installing in a mulch bed, don’t anchor into mulch. Mulch is decorative fluff, not structure. Clear mulch down to soil where the stake goes, anchor in soil, then pull mulch back around it. Your lights won’t lean like they’re tired of life.
Also: if the kit has a two-piece stake (common), assemble it tight. Loose joints = wobble = lean.
Install step-by-step (the pro sequence)
- Unbox and check for “ON” switches. Yes, really. Half of installs fail because the switch is off.
- Charge once before judging. Give them a full sunny day or two to reach steady performance.
- Mark your spacing. Drop small stones or flags at each location so you can step back and judge the line.
- Pre-make holes. Pilot hole in hard soil. No exceptions.
- Seat stakes straight and deep. Push down with two hands; don’t twist the lamp head like a jar lid.
- Tamp the soil. Press soil around the stake so it’s snug. Stability matters.
- Do a night check. Let them run one night, then adjust aim/position while it’s fresh.
Want to avoid the classic mistakes that make solar lights look like a bad impulse buy? Read installation and maintenance: avoid these 7 rookie mistakes. It’ll save you from re-doing the whole layout after one windy weekend.

Tool tip: If you’re shopping for simple install helpers, don’t overthink it. A rubber mallet (for edging and gentle taps), a bulb planter, and quality replacement rechargeables cover 90% of the real-world issues.
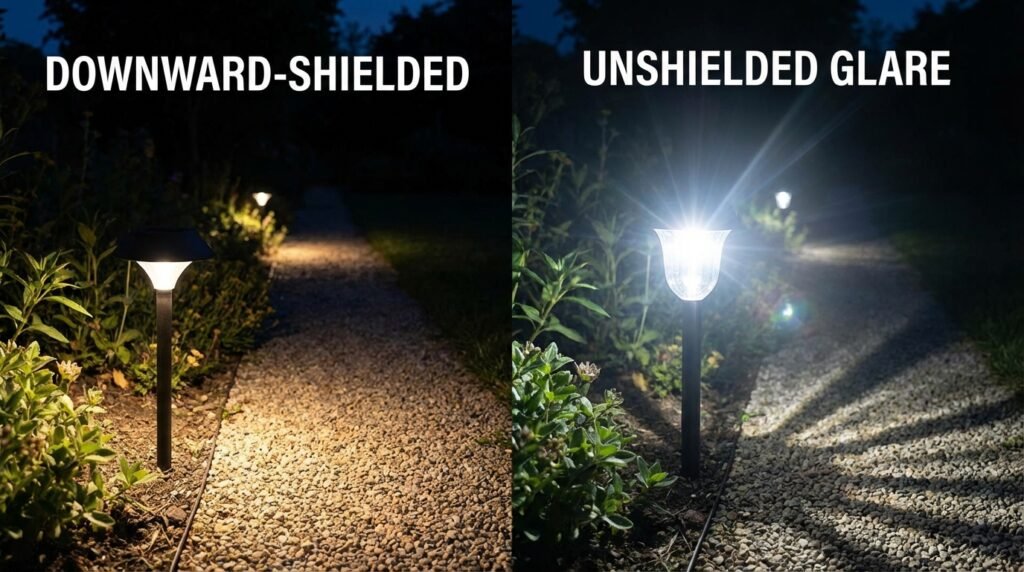
Aim, glare control, and “why does it look weird?”
Here’s the part nobody tells you: even “good” solar path lights can look bad if the beam hits your eyes. Glare makes your yard feel harsher and actually reduces perceived visibility because your pupils constrict. So don’t aim for “bright.” Aim for usable.
Insider rule: the light should hit the ground, not your face. If the fixture has a clear lens and a visible LED point, keep it low and angle it so the hotspot lands on the path surface.
If your walkway is raised or the path borders steps, treat those areas like safety zones. Place a light slightly closer to the step edge and keep the beam downward. It’s subtle, but it’s the difference between “nice landscaping” and “why is this uncomfortable?”
Batteries and the first charge cycle
Many solar lights ship with the battery undercharged or in a “storage state.” That’s normal. What’s not normal is judging them after 20 minutes of daylight and calling them trash.
Do a proper first cycle: turn them on, leave them in full sun for a full day, then let them run overnight. After 1–2 cycles, performance stabilizes. If they still fade early, now we troubleshoot.
If your lights use replaceable rechargeables (often AA or AAA NiMH), upgrading batteries can be the cheapest performance boost you’ll ever buy. If they’re sealed units, you’re married to whatever cell they used—good luck.
If you want a deeper technical read on PV performance factors (irradiance, angle, temperature impacts), the National Renewable Energy Laboratory is a legit rabbit hole—in a good way (NREL).
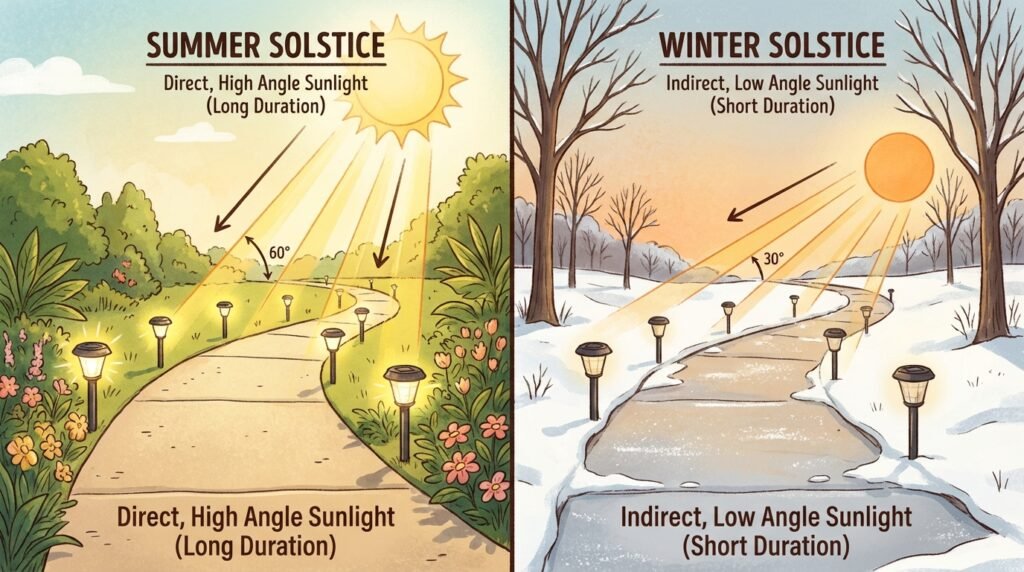
Weather, seasons, and expectations (the adult talk)
Solar path lights are seasonal performers. In winter, days are shorter and the sun angle is lower. Cloud cover and snow don’t help. If you expect “summer brightness” in January, you’re setting yourself up for disappointment.
Here’s the truth: if you live in a cloudy region or have heavy shade, the “48 hours runtime” claims are marketing cosplay. Also, cold temperatures can reduce battery performance (especially if the batteries are cheap or aged). For general battery behavior (including why cold matters), Wikipedia’s battery overview is a decent starting reference (Rechargeable battery basics).
Best move? Design your layout so it still looks good when lights are operating at 60–70% of their best-night output. That means smart spacing and glare control, not piling on more weak lights.
If you’re still in the buying phase and want models that hold up better in real conditions, hit the no-BS deals guide again and prioritize build quality and battery design over “8000 lumen mega tactical” nonsense.
Maintenance that actually moves the needle
Maintenance isn’t complicated, but it’s non-negotiable if you want consistent output.
- Clean panels monthly (more if pollen/dust is heavy). A damp microfiber cloth is enough.
- Trim plants that start shading panels. Your shrubs don’t care about your lighting goals.
- Check for wobble after storms. Re-tamp soil, re-seat stakes.
- Battery refresh every 12–24 months for replaceable NiMH setups (varies by climate and quality).
What sucks: flimsy plastic stakes in hard soil and lights with unsealed tops that let moisture in. If you see condensation inside the lens regularly, that’s a long-term failure path.
Frequently Asked Questions
How far apart should solar path lights be spaced?
Start at 6–8 feet for most paths. Tighten to 4–6 feet for dimmer lights or wider walkways. If you’re tempted to place them every 2 feet, you don’t want “better lighting”—you want better lights.
Do I need to dig holes to install solar path lights?
Not usually. Most are stake-in. But in clay/rocky soil, you should absolutely pre-make a pilot hole. Forcing the stake is how you break it and waste your afternoon.
Why are my solar path lights dim after installation?
Usually shade, dirty panels, or a battery that hasn’t completed 1–2 full charge cycles. Clean the panel, confirm the switch is ON, give it real sun, and consider upgrading to quality NiMH batteries if the design allows it.
Should solar path lights be installed in shade?
No. Shade kills charge. If you have to compromise, choose fewer lights and place them where the sun is strongest. A perfectly aligned row of dim lights is still… dim.
How do I keep solar path lights from leaning or getting knocked over?
Anchor in soil (not mulch), seat the stake straight and deep, and tamp around it. In high-traffic areas, place them slightly off the edge and avoid spots that get clipped by trimmers.
Final insider takeaway
Bottom line: the “secret” to how to install solar path lights is boring—but it works: put panels in real sun, space lights like you have taste, pre-drill in hard soil, keep beams down, and don’t judge performance until you’ve run full charge cycles.
If your setup still looks weak after that, it’s not your installation anymore—it’s the hardware. And that’s when you stop buying mystery packs and start buying fewer, better lights. Your yard (and your sanity) will thank you.
As an Amazon Associate, I earn from qualifying purchases.