
Solar path lights buyer’s guide and reviews is basically the difference between a clean, safe walkway and a yard full of dim plastic stakes that die right after you forget the return window. If you want lights that actually stay bright, survive weather, and don’t look like a dollar-store science experiment, focus on five things: where the sun hits, real brightness (not marketing “equivalent”), battery type, water sealing, and the optical design (how the light is shaped and aimed).
Here’s the “do this first” checklist before you spend a cent: (1) stand where you’ll place the lights at noon and again late afternoon—if you don’t get solid sun, pick “low-light / high-efficiency” styles and accept lower brightness; (2) decide whether you need “see the path” lighting or “pretty ambiance”; (3) pick warmer color temps (around 2700K–3000K) unless you’re intentionally going modern; (4) avoid tiny panels with giant lumen claims; (5) buy fewer, better lights and place them correctly—spacing beats spam-installing 24 weak stakes.
Table of Contents
- Fast picks: match the light to the job
- How to think like a buyer (not like a marketer)
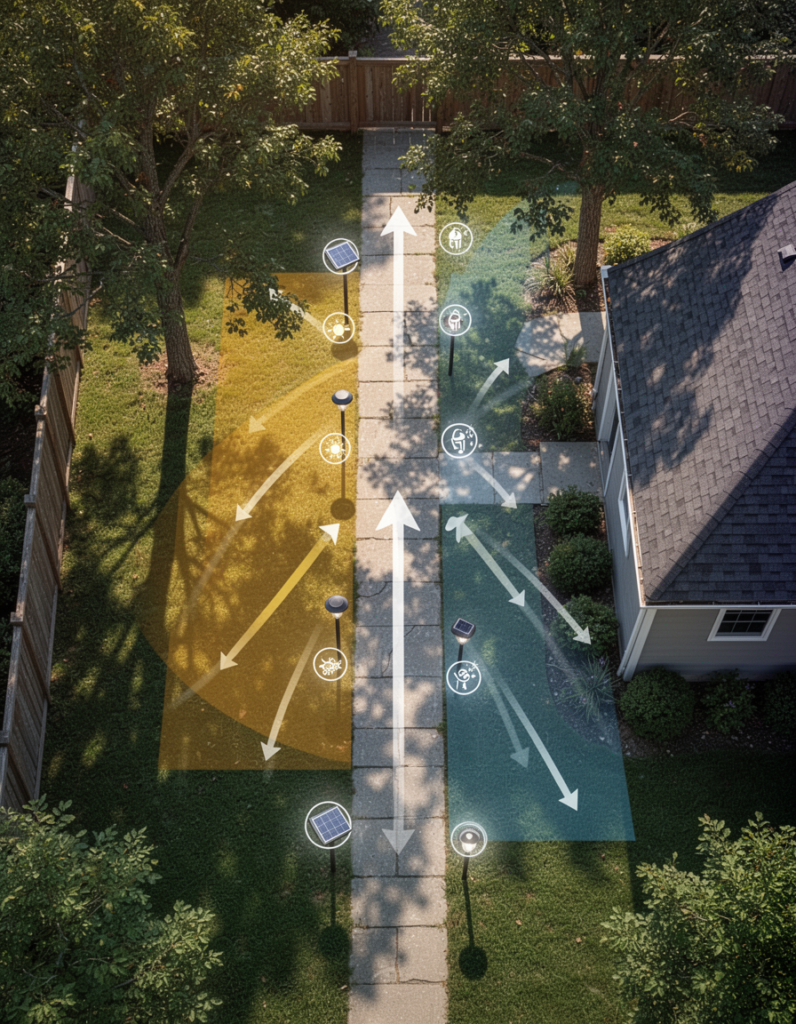
- The 3-minute sun audit that prevents 80% of failures
- Brightness that matters: lumens, optics, and spacing
- Color temperature, glare, and “why does this look cheap?”
- Battery + panel reality: what actually drives runtime
- Weatherproofing and materials: surviving rain, heat, and winter
- Controls and sensors: dusk-to-dawn, motion, and smart features
- Installation that stays straight (and doesn’t get stolen)
- Reviews by type: what to buy for each use case
- Common mistakes (and the fixes)
- Maintenance and troubleshooting: keep them bright for years
- FAQ
- Resources / Tools (Amazon picks)
Fast picks: match the light to the job
If you skim everything else, at least match the product type to the actual job. Most disappointment comes from buying “decorative” lights and expecting “security” performance.
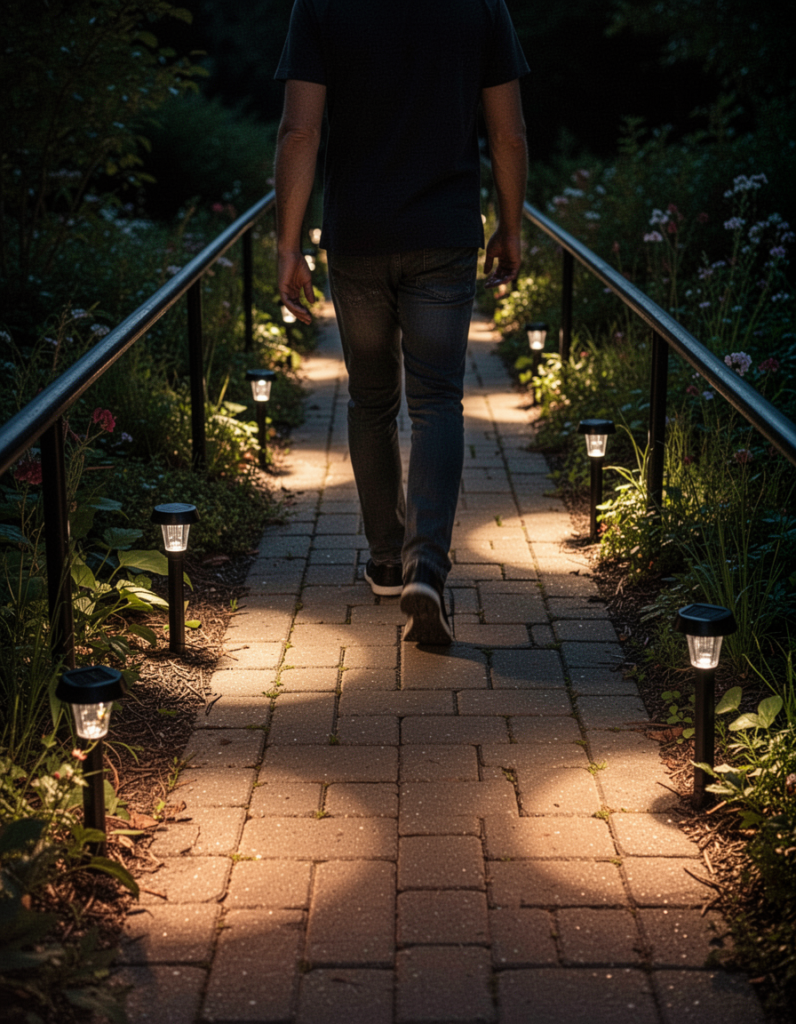
Solar path lights buyer’s guide and reviews: Walkway safety (seeing edges, steps, and uneven pavers)
Look for downward-focused optics that create a clean pool of light on the ground. You want controlled light, minimal glare, and enough brightness to read surface texture. If the lens throws light sideways into your eyes, it’ll feel brighter… while the ground stays dim. That’s the worst combo.
Landscape ambience (making the yard feel finished)
Go warmer (2700K–3000K), lower brightness, and prioritize beam pattern and diffusion. Soft light looks expensive. Harsh blue-white looks like a parking lot. If you want the “boutique hotel patio” vibe, your goal is gentle rhythm along the path, not runway lights.
Driveway outline (visibility from the street)
You need taller fixtures or slightly higher lumen units, but still with good shielding. A brighter light with poor glare control will annoy you (and neighbors) every night.
Pool decks and wet areas
Choose stronger water sealing, better materials, and designs that won’t trap water. “Weather resistant” is not a spec; it’s a vibe. Look for real IP ratings and solid construction.
Low-sun yards (trees, shade, winter sun angle)
Pick efficiency and battery quality over big lumen claims. In shade, the best performer is the one that charges reliably, not the one with the loudest packaging.
Insider Tip: If you’re torn between buying 12 cheap lights or 6 better ones, buy 6 better ones and place them correctly. Path lighting is spacing plus beam control. Quantity doesn’t fix weak optics.
Solar path lights buyer’s guide and reviews: How to think like a buyer (not like a marketer)
Solar path lights live at the intersection of optics, battery chemistry, and weather abuse. Marketing lives in the intersection of “9999 lumens” and “works all night” printed on a box made of dreams. Your job is to ignore the hype and evaluate the system.
Think in systems: panel → battery → driver → LED → optics
Every solar path light is a small energy pipeline. The solar panel collects energy, the battery stores it, the driver regulates it, and the LED + optics deliver usable light. If any link is weak, performance collapses. This is why “looks bright in the listing photo” means nothing.
The only numbers that consistently matter
- Panel size and exposure: bigger panel + direct sun = more reliable charging.
- Battery type: better chemistry typically means better cold-weather performance and longer life.
- IP rating / sealing quality: water intrusion is the silent killer.
- Optical design: shielded/downward light beats “glowy lantern” for actual path visibility.
- Color temperature: warmer usually looks better in landscapes and reduces harsh glare.
For general lighting performance and efficiency basics, the U.S. Department of Energy’s lighting guidance is a solid reference point: DOE LED lighting overview. For broader energy-efficient outdoor lighting design concepts, see DOE lighting design guidance.
Bonus: don’t accidentally create light pollution
Over-lighting is common, and it backfires. Glare reduces visibility, annoys neighbors, and can disrupt wildlife. If you want a clean, responsible setup, follow DarkSky’s principles for responsible outdoor lighting: DarkSky lighting principles. If you want a stricter benchmark, DarkSky also publishes luminaire guideline criteria that show what “controlled light” actually means: DarkSky luminaire guidelines.
The 3-minute sun audit that prevents 80% of failures
Solar path lights don’t fail because solar is “bad.” They fail because the install location never had enough sun to begin with. Do this once and you’ll save money and headaches.
Solar path lights buyer’s guide and reviews Step-by-step: quick, practical, no-app method
- Check noon sun: stand where the light will sit around midday. If shadows dominate, that spot is “low charge.”
- Check late-day sun: the last few hours of sun often matter a lot because the battery may top-off before night. If trees/buildings block late sun, expect shorter runtime.
- Watch for “seasonal shade” traps: summer sun can look great while winter sun is weak and low-angle. If you live where winters are long, buy accordingly.
If you want the physics basics (how PV converts sunlight to electricity), energy.gov’s primer is straightforward: Solar photovoltaic technology basics.
If the yard is shaded, you still have options
- Go lower brightness but higher consistency: lights that run reliably at moderate output beat “bright for 30 minutes.”
- Choose better optics: a modest light aimed correctly can outperform a brighter light that wastes output sideways.
- Consider fewer lights with smarter placement: move them to the sunniest edge and use them to “pull” the eye along the path.
Want a tighter content structure for building your site’s buyer-guide ecosystem? Link this pillar into your hub strategy using solar lighting basics and installation planning so readers don’t bounce when they realize they need layout help.
Brightness that matters: lumens, optics, and spacing
Brightness is not just “more lumens.” It’s usable light on the surface you care about. Two lights with the same lumen claim can feel totally different because optics control where light goes.
Lumens vs. useful light (the part you actually see)
Lumens are total light output. But if half of that output blasts into your eyes or up into the sky, it’s wasted for path safety. A shielded fixture that aims light downward can make a lower-lumen light feel more effective.
Practical brightness targets (realistic ranges)
- Subtle ambiance: low output with wide, soft diffusion. Great for patios and decorative edges.
- Walkway guidance: moderate output with a controlled downward beam; enough to see edges and texture.
- Steps and hazards: prioritize consistent pools of light and tighter spacing rather than extreme brightness.
Insider Tip: If the goal is safety, don’t “light the whole yard.” Light the decision points: the first step, the turn, the uneven paver, the curb. That’s how pros get results without glare.
Spacing rules that stop the “spotty runway” look
Most people space path lights too far apart, then crank brightness to compensate. That creates harsh bright spots and dark gaps. Better approach: use moderate brightness and tighten spacing at turns, steps, and entries.
- Even rhythm: keep spacing consistent on straight segments.
- Compression at hazards: place lights closer at steps, slopes, and transitions.
- Avoid face-level glare: if you see the LED source while walking, reposition or change design.
Beam patterns you’ll see in the real world
- Downlight “pool”: best for walkways; clean circle/oval on the ground.
- Lantern glow: pretty but often inefficient for seeing the path; tends to glare.
- Directional/spot: useful for highlighting features, but can look uneven for paths.
- Diffused globe: soft and decorative; not a safety-first choice.
If you care about reducing glare and light trespass, DarkSky’s principles are worth following in residential installs too: responsible outdoor lighting principles.
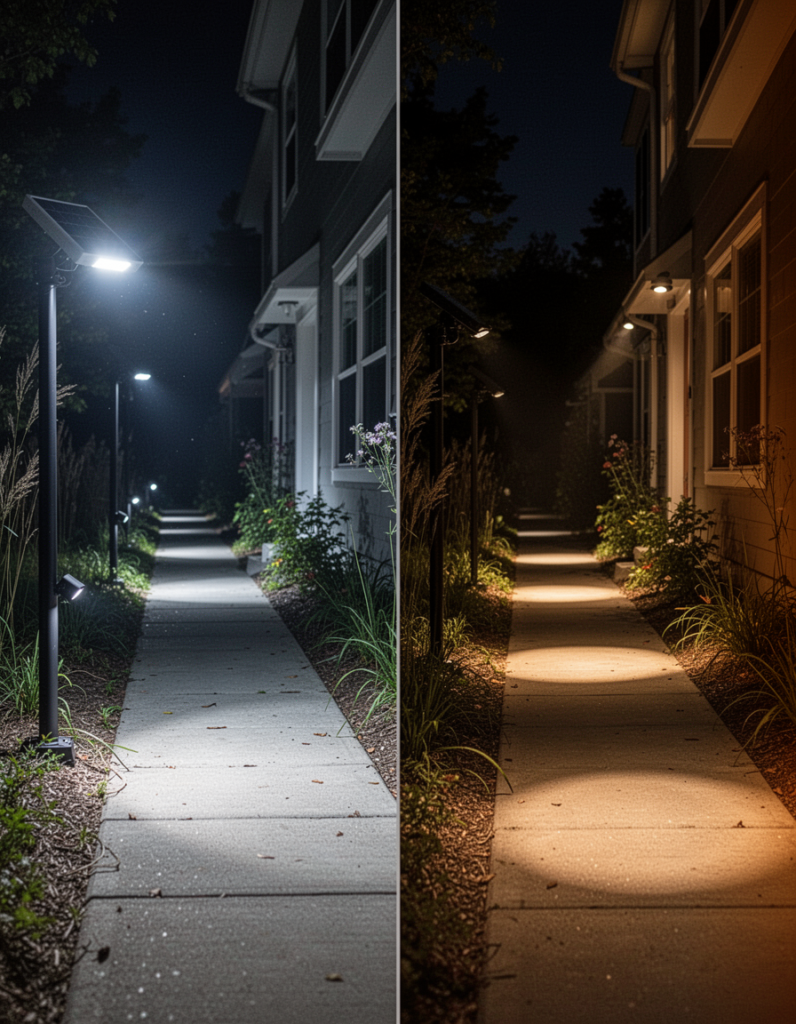
Color temperature, glare, and “why does this look cheap?”
Color temperature is the fastest “vibe lever” you control. It also affects perceived glare. Many cheap solar lights default to cooler white because it looks “bright” in photos. In real yards, it can look sterile and harsh.
What to pick (most homes)
- Warm white (around 2700K): classic, cozy, hides minor imperfections, looks high-end in landscapes.
- Soft white (around 3000K): clean and modern without being icy; often the best compromise.
- Cool white (4000K+): modern, sharper, can feel harsh; use intentionally, not by accident.
Glare control is not optional
Glare makes you squint, reduces contrast, and ironically makes it harder to see trip hazards. If a fixture exposes the LED directly, you’ll notice it every night. Shielded designs that hide the LED source feel calmer and more premium.
Common-sense rule: If you can see the bright point source from normal walking height, it’s going to get annoying.
Neighbors and wildlife: keep it polite
If you’ve ever had a neighbor’s yard light shining into your window, you know the vibe. Keep output controlled, aim it down, and avoid over-bright cool light. For public-land-style guidance on minimizing night-light impacts, the Bureau of Land Management has a technical note on night sky and dark environments: BLM night sky and dark environments.
Battery + panel reality: what actually drives runtime
This is where most “all-night” claims die. Runtime depends on how much energy the panel collected and how efficiently the electronics use it. If the panel is tiny or shaded, you’re running on fumes.
Battery chemistry basics (what you’ll run into)
You’ll typically see rechargeable battery systems built around common rechargeable chemistries. Here’s what matters in practice:
- Cold performance: some batteries lose usable capacity faster in low temps. If you get real winters, plan for shorter nights and reduced capacity.
- Cycle life: better cells survive more charge/discharge cycles before they fade.
- Replaceability: lights with accessible, standard-size replaceable batteries can outlive sealed “throwaway” designs.
Panel size and angle (the unsexy truth)
Bigger panel area generally means more charging potential, especially in shoulder seasons. Panel angle matters too—flat-topped lights can underperform when the sun is low. That doesn’t mean flat is “bad,” it means you must have more sun exposure or accept lower output.
If you want a deeper but still consumer-friendly overview of solar electricity considerations, NREL’s consumer guide is a strong reference: NREL consumer guide: get your power from the sun (PDF).
Runtime tradeoffs: bright vs. long
Most decent solar lights run a simple strategy: start brighter early evening, then step down later, or run a steady medium output. The “right” choice depends on your use.
- Entertaining / curb appeal: strong early-evening output matters most.
- Late-night visibility: you want stable output and reliable charging.
- Motion-trigger security accents: low background glow + burst brightness on motion is efficient.
Insider Tip: If a listing screams insane lumen numbers without showing a real panel size and real battery details, assume it’s marketing math. Trust what you can see: panel area, construction, sealing, and optics.
Replace the battery, don’t trash the light
Many “dead” solar path lights aren’t dead. The rechargeable battery has just worn out. If the design allows simple battery replacement, your cost-per-year drops hard. If it’s sealed, you’re basically buying disposable lighting, just with extra steps.
For a deeper tutorial-style piece you can link to from this pillar, build a maintenance explainer like how to replace and upgrade solar light batteries so visitors who hit troubleshooting don’t bounce to YouTube and disappear.
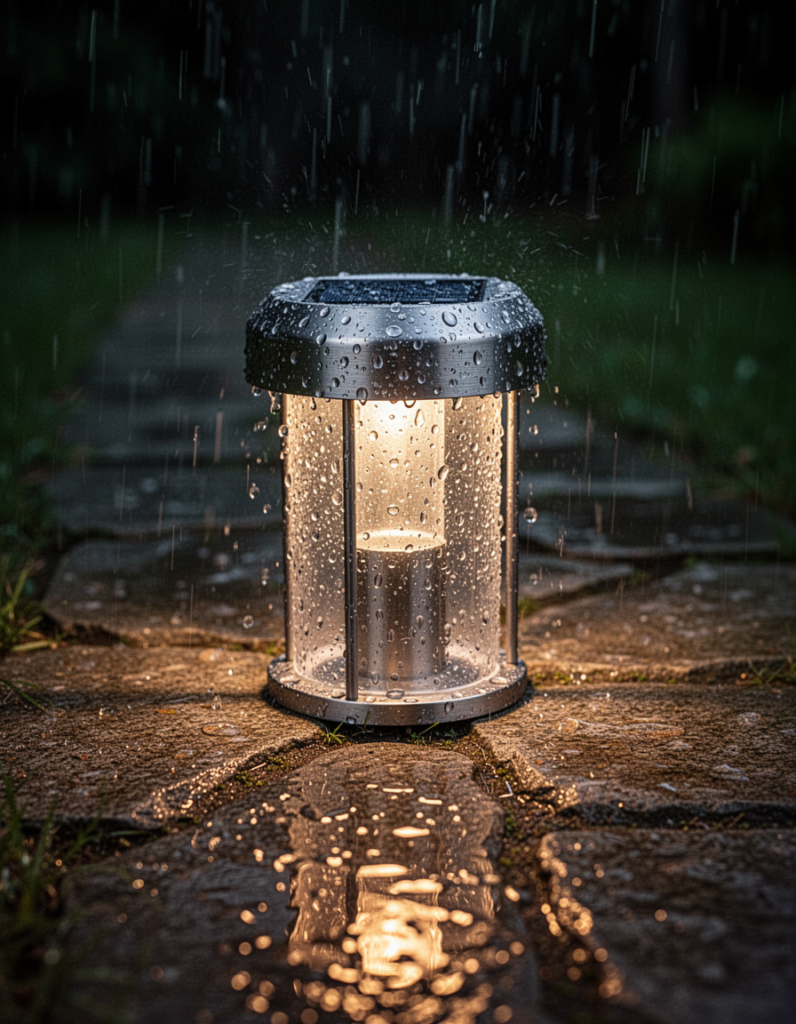
Weatherproofing and materials: surviving rain, heat, and winter
Water intrusion kills lights. UV degrades plastics. Freeze-thaw cycles loosen cheap housings. If you want a set that doesn’t become a sad yard graveyard, treat durability like a primary feature.
IP ratings: the shortcut to sanity
IP ratings are imperfect, but better than vague “weatherproof” claims. The higher the protection against water ingress, the better your odds in real rain, sprinklers, and wet soil. Also: sealing quality matters as much as the printed rating.
Materials that tend to last longer
- Metal housings: often feel more premium and resist UV better than cheap plastic.
- UV-stabilized plastics: can be excellent if well-made; cheap plastics haze and crack faster.
- Thicker stakes and reinforced mounts: keep lights upright and reduce wobble over time.
Winter performance reality
Winter is the stress test: shorter days, lower sun angle, more clouds, colder batteries. Expect reduced runtime and brightness unless you buy for efficiency and have good sun exposure. If you want “always bright all night” in deep winter, that’s usually a wired lighting job, not a solar path light job.
Common mistake: Buying bright summer performers for a yard that gets weak winter sun. The fix is either better placement (more sun), fewer lights with higher-quality components, or accepting lower winter output and designing around it.
Controls and sensors: dusk-to-dawn, motion, and smart features
Controls are the hidden “quality multiplier.” A good control strategy makes limited solar energy feel like more light when you need it.
Dusk-to-dawn (standard) vs. modes (better)
Basic lights turn on at dusk and run until the battery hits a cutoff. Better lights offer modes: steady low, steady medium, or adaptive brightness. If you care about late-night visibility, a steady medium (not a blazing high) often performs best over a full night.
Motion sensors: the best “efficiency hack”
Motion can be great when used correctly: a low glow for ambiance plus a brighter pop when someone walks by. That gives you visibility without draining the battery all night.
Smart features: nice, but don’t pay for fluff
Some sets claim app control, grouping, or color effects. Cool if you want it. But don’t sacrifice core fundamentals (panel, battery, sealing, optics) for features you’ll use twice and then forget exist.
Common mistake: Overpaying for “smart” while ignoring installation constraints. Smart doesn’t fix shade. Smart doesn’t fix leaky housings. Smart doesn’t fix glare.
Installation that stays straight (and doesn’t get stolen)
Installation is where good lights turn into a good system. Also where many people accidentally sabotage performance.
Stake depth and stability
If you push stakes into hard soil and they bend or loosen, lights lean over time. That shifts panel angle and kills charging. If the soil is rocky, pre-drill a pilot hole with a rod or use a sturdier mounting approach.
Alignment: aim for the ground, not the eyes
Walk your path at night right after install. If any fixture creates a bright point source at eye level, adjust it. A small angle change can transform comfort.
Basic theft resistance
Solar path lights are easy to grab. If theft is a risk, use fewer higher-quality fixtures placed closer to the home, or consider discreet anchoring approaches. Also: avoid the “perfectly spaced, perfectly visible from the sidewalk” look if your neighborhood has wandering hands.
Build a practical “layout calculator” or spacing guide page and link it from this pillar (and from your future category hubs) using path light spacing and placement calculator.
Reviews by type: what to buy for each use case
Instead of pretending one product is “best for everyone,” here are the real categories that matter. These “reviews” focus on design types and feature sets, because that’s what determines whether you’ll be happy after the novelty wears off.
Best for walkways: shielded downlights
What they do well: Put light where you need it—on the ground—while minimizing glare. They’re the closest thing solar path lights have to “professional-looking” path lighting.
Tradeoffs: They can look less decorative in daylight. Some designs prioritize function over “cute lantern vibes.”
Who should buy: Anyone with steps, uneven pavers, seniors in the household, or a path that actually needs to be walked at night.
What to look for: A hood/hat that blocks direct view of the LED, solid stakes, and a decent-sized panel relative to body size.
Best for curb appeal: warm diffused lantern styles (done right)
What they do well: Create a welcoming, finished look. Warm diffused light makes landscaping feel intentional.
Tradeoffs: Many lantern designs waste output sideways and upward, so the path may still be dim.
Who should buy: People who care more about vibe than “I need to see every pebble.”
What to look for: Diffusion that’s even (no harsh hot spots), warm color temperature, and enough output to avoid the “firefly” effect.
Best for driveway edges: taller fixtures with controlled spill
What they do well: Help drivers and guests see edges without needing stadium lighting.
Tradeoffs: Taller lights are more visible (aesthetic risk) and sometimes more prone to wobble in loose soil.
Who should buy: Homes with long driveways, narrow edges, or landscaping borders that disappear at night.
Best for dark corners: motion-boost path lights
What they do well: Save battery by running low, then pop brighter when motion is detected. Great when you want reassurance without draining power.
Tradeoffs: Not everyone loves changing brightness; it can feel “busy.”
Who should buy: People who arrive home late, have side-yard paths, or want a subtle security boost.
Best for low sun: efficiency-first, steady-output designs
What they do well: They keep running when the “bright” ones give up. They’re built around realistic energy budgets.
Tradeoffs: They won’t win brightness contests in marketing photos. That’s a feature, not a bug.
Who should buy: Tree-heavy yards, north-facing paths, winter-heavy climates, and anyone who hates replacing lights.
Best for modern style: clean lines, 3000K, minimal glare
What they do well: Make contemporary homes look sharp without over-lighting. When done right, they look intentional, not “sprinkled around.”
Tradeoffs: Cheap modern-looking lights often hide poor optics behind a pretty housing. Don’t get fooled.
Best for kids and pets: safer walking zones
What they do well: Reduce trips and falls by lighting the ground consistently.
Tradeoffs: You may need more fixtures or tighter spacing than you expected.
Who should buy: Anyone who’s sprinted outside barefoot at night and immediately regretted it.
Best for coastal and humid environments: corrosion-resistant builds
What they do well: Survive humidity, salt air, and constant moisture better than bargain plastics.
Tradeoffs: Usually costs more; the cheap stuff often turns ugly faster.
On “how bright is too bright,” it helps to borrow professional outdoor lighting ideas about glare and light trespass. DOE’s outdoor lighting materials discuss these concepts at a higher level: DOE outdoor area lighting fact sheet (PDF).
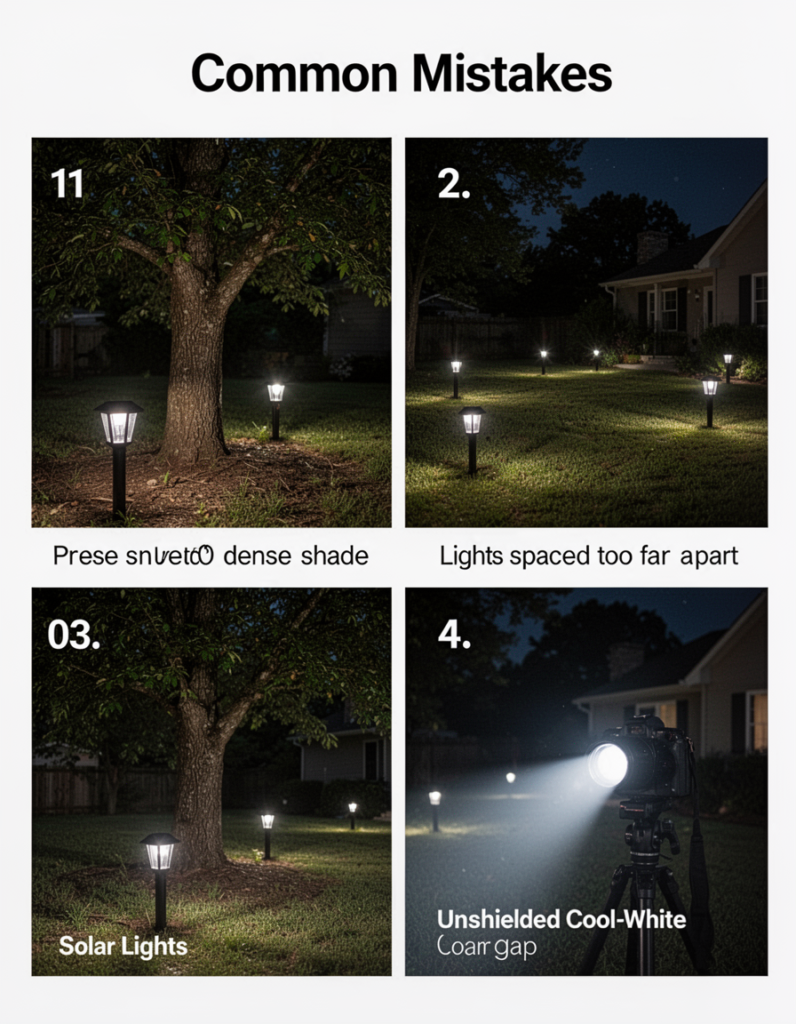
Common mistakes (and the fixes)
Mistake #1: buying by lumen claims alone
What happens: You buy “super bright,” then you get glare, short runtime, and uneven lighting.
Fix: Prioritize optics + spacing + reliable charging. Moderate brightness delivered well looks better and works better.
Mistake #2: installing in shade and blaming the lights
What happens: Dim output, early shutdown, and inconsistent behavior.
Fix: Move fixtures to the sunniest path-adjacent zones, or pick low-sun designs and accept lower brightness.
Mistake #3: spacing too far apart
What happens: Bright spots and dark gaps, like a bad runway.
Fix: Tighten spacing at hazards and turns. Use the path like a sequence of “visual beats.”
Mistake #4: cool-white everywhere
What happens: The yard looks sterile and cheap, glare is worse, and the light feels intrusive.
Fix: Choose warm or soft white for most landscapes; use cooler temps only if your home’s style supports it.
Mistake #5: ignoring sealing quality
What happens: Fogged lenses, corrosion, flicker, random failures.
Fix: Look for real IP ratings, better construction, and designs that don’t trap water.
Insider Tip: Condensation inside the lens is an early warning. Don’t “wait and see.” Water intrusion doesn’t heal itself. Replace or warranty-claim early before corrosion spreads.
Maintenance and troubleshooting: keep them bright for years
Solar path lights are low-maintenance, not no-maintenance. A tiny bit of upkeep prevents most “mysterious” issues.
Clean the solar panels (yes, really)
Dust, pollen, and grime reduce charging. A quick wipe with a damp cloth every few weeks in dusty/pollen-heavy seasons can noticeably improve performance.
Replace rechargeable batteries when output fades
After enough cycles, battery capacity drops. If your lights used to run well and now fade early, battery replacement is often the win. Lights designed for battery replacement are a better long-term buy.
Use winter mode thinking
In winter, your goal is reliability, not maximum brightness. Switch to a lower output mode if available. You’ll get more consistent overnight light.
Quick diagnosis flow (fast, practical)
- Check the panel: clean it and ensure it’s actually getting sun.
- Check the on/off switch: yes, it sounds obvious. It’s also a classic.
- Test one light in full sun: move it to a known sunny spot for a day. If it works there, your original location is the issue.
- Look for condensation: fogging suggests sealing problems.
- Swap batteries if replaceable: if performance rebounds, you found the culprit.
Flicker or random shutoff
Flicker often comes from moisture intrusion, a failing battery, or a weak connection inside the housing. If it’s new, treat it as a warranty issue. If it’s old, the battery is the first suspect, followed by corrosion.
Dim from day one
That’s usually a placement problem (shade) or expectation mismatch (decorative lights used for safety). Re-evaluate sun exposure and choose the right category of light for the job.
FAQ
How many solar path lights do I actually need?
Count the “decision points” first: steps, turns, entries, and uneven areas. Then fill straight segments with consistent spacing. Most people need fewer lights than they think, but placed more intentionally.
How far apart should solar path lights be spaced?
There’s no magic number that fits every light. Use spacing that creates overlapping pools of light with minimal dark gaps. Tighten spacing at hazards and curves.
Why are my solar lights dim in winter?
Shorter days, lower sun angles, and colder batteries reduce stored energy and usable capacity. Switch to lower-output modes if available, improve sun exposure, or accept seasonal performance changes.
Is warm white or cool white better for outdoor paths?
Warm or soft white usually looks better in landscapes and reduces harsh glare. Cool white can look modern, but it’s easier to overdo and make the yard feel sterile.
Do solar path lights need direct sun?
Direct sun produces the best charge. Some lights can limp along in partial shade, but brightness and runtime drop. If the panel rarely sees sun, expect disappointment.
How long do solar path lights last?
It varies wildly by build quality and whether the battery is replaceable. The housing can last years, but batteries are a wear item. Better designs let you replace the battery instead of replacing the whole light.
What does “waterproof” really mean for solar path lights?
Ignore vague words and look for an IP rating and solid construction. Even then, real-world sealing quality matters. If you see condensation inside the lens, sealing is failing.
Should I buy motion sensor path lights or steady-on?
Motion-boost is great for battery efficiency and late-night usefulness. Steady-on is better for consistent ambiance. If you want both, choose lights that run low and boost on motion.
Should I always buy the brightest lights available?
No. Bright plus poor optics creates glare and spotty lighting. Moderate brightness with good beam control and smart spacing usually looks better and works better.
When should I stop messing with solar and go wired?
If you need guaranteed brightness all night in deep shade, heavy winter, or for true security lighting, wired lighting is often the right tool. Solar is best when you have decent sun and want easy installs.
How often should I clean solar panels on the lights?
In dusty or pollen-heavy seasons, every few weeks helps. Otherwise, monthly is fine. If performance drops unexpectedly, cleaning is the first easy win.
Resources / Tools
Below are Amazon search links for practical products that pair well with solar path lights—either to upgrade performance, install cleaner, or keep them running longer. These are search links (not direct product links) so you can compare current best options.
- Replacement rechargeable batteries (outdoor-rated)
Benefit: Restores runtime when lights fade early; often the cheapest “upgrade.”
Best for: Lights with replaceable battery compartments.
Check options on Amazon - Shielded solar path lights (downward-focused)
Benefit: Better visibility on the ground with less glare in your eyes.
Best for: Walkways, steps, and safety-first installs.
Check options on Amazon - Warm white solar path lights (2700K–3000K look)
Benefit: More natural curb appeal; reduces “parking lot” vibe.
Best for: Front paths, gardens, patios, and landscaping ambience.
Check options on Amazon - Solar path lights with motion sensor boost
Benefit: Saves battery by running low, then brightens when you approach.
Best for: Side yards, late-night arrivals, and efficiency-focused setups.
Check options on Amazon - Heavy-duty garden stakes / ground anchors
Benefit: Keeps lights straight in hard soil and reduces wobble over time.
Best for: Rocky ground, clay soil, windy areas.
Check options on Amazon - Outdoor-rated silicone sealant (for minor sealing fixes)
Benefit: Helps reinforce seams on budget lights (carefully) to reduce water ingress.
Best for: DIY-minded owners who want to extend life on borderline fixtures.
Check options on Amazon - Microfiber cloths for panel cleaning
Benefit: Quick cleaning improves charging; gentle on plastic lenses and panels.
Best for: Dusty climates, pollen seasons, regular maintenance.
Check options on Amazon - Landscape edging markers / reflective driveway markers
Benefit: Adds visibility without relying only on light output; helpful where solar is limited.
Best for: Long driveways, curves, and low-sun properties.
Check options on Amazon - Low-voltage path lighting kits (wired alternative)
Benefit: Reliable brightness regardless of shade and winter sun limitations.
Best for: Deep shade, “always on” needs, and premium installs.
Check options on Amazon - Solar walkway lights multipack (budget fill-in)
Benefit: Cheap way to add decorative rhythm—best when expectations are realistic.
Best for: Ambience-only installs and short paths with good sun.
Check options on Amazon
As an Amazon Associate I earn from qualifying purchases.